By Angry Staff Officer for CIMSEC’s “Movie Re-Fights Week”
Anyone familiar with the late Galactic Civil War will remember the outstanding triumph by the Rebel Alliance at the Battle of Hoth. Many had considered that this would be a last stand by the Alliance, or at the very least a mere draw if enough transports were able to get away before the Imperial Fleet bore down on them. However, the Alliance was able develop a battle plan that was built on an analysis of the Imperial ground forces’ tactics, techniques, and procedures from years of fighting. This plan emphasized the Alliance’s maneuverability and the terrain that they had chosen for the engagement.
[otw_shortcode_button href=”https://cimsec.org/buying-cimsec-war-bonds/18115″ size=”medium” icon_position=”right” shape=”round” color_class=”otw-blue”]Donate to CIMSEC![/otw_shortcode_button]
Prior to the engagement, the general staff for the Rebel Alliance had wargamed possible enemy avenues of approach and strike group composition. Because they had effectively shielded their base on the snow-bound planet of Hoth, they knew that the Empire would have to land a strike force on the planet to try to knock out the shield generator. Attempts to enter the battlespace with air assets could be nullified by the Alliance’s Ion Cannon. Additionally, early warning sensors were placed both on the planet’s surface as well as in the atmosphere.
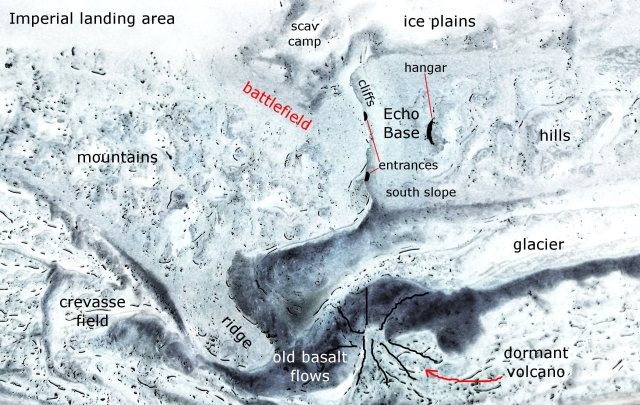
The Alliance’s Echo Base and shield generator were safely harbored inside a draw with only one ground avenue of approach. This site was carefully selected after a thorough intelligence preparation of the battlefield by Alliance engineers and intelligence officers. They could thus canalize any approaching ground force between two ridges of ice and rock. Analyzing the Imperial task organization from past battles, Alliance intel officers theorized that they would most likely attempt to infiltrate with heavy All Terrain Armored Transport (AT-AT) Imperial Walkers and dismounted ground troops to exploit gaps. This would leave them vulnerable on their flanks and rear to air sorties from Alliance T-47 snowspeeders.
Additional preparations included the development of an engagement area in the draw, with obstacle emplacement and fields of fire picked out for concealed heavy weapons. Deep pits were dug and camouflaged with hologram imagery to make the ground appear level. These were offset between lanes of massive tanglefoot: lengths of wire attached to deep stakes sunk into the ice that would impede vehicular movement. Additionally, two belts of landmines were placed in the expected Imperial landing area to disrupt the attack at its outset. Heavy weapons emplacements were dug into the slopes of the surrounding hills to strike at any vulnerabilities in the AT-AT’s armor. In the enemy’s immediate front, several dummy gun emplacements were created to draw the Imperial troops into the trap. The goal was to create as much havoc as possible to the Imperial heavy armor to degrade the morale of their dismounted troops.
The ground forces commander established his heavy weapons fields of fire and coordinated with the Alliance air wings of snowspeeders, specifically Rogue Squadron, to define their flight patterns, where they would infiltrate the battlefield, and where they would exfiltrate, thus avoiding any friendly fire. They gambled that they would have immediate air superiority as the Empire would wait until the shield was down before sending in any air assets. Final protective fires were set at the entrance to Echo Base, where Alliance planners hoped that they could at the very minimum establish a choke point with destroyed Imperial vehicles. Rather than commit to a linear defense, the Alliance relied on a defence in depth, which allowed greater freedom of movement for their dismounted infantry to avoid the heavy guns of the AT-ATs.
The Alliance commander on Hoth, General Carlist Rieeken, assumed a certain amount of risk committing his forces to the battle. He maintained his contingency plan of escape from the planet via transports to assuage his conscience that was still plagued by the loss of Alderaan. Princess Leia Organa emphasized that Hoth was the ideal place to deliver the empire a dramatic defeat that would resound throughout the Galaxy, and Rieeken reluctantly went along with the plan.
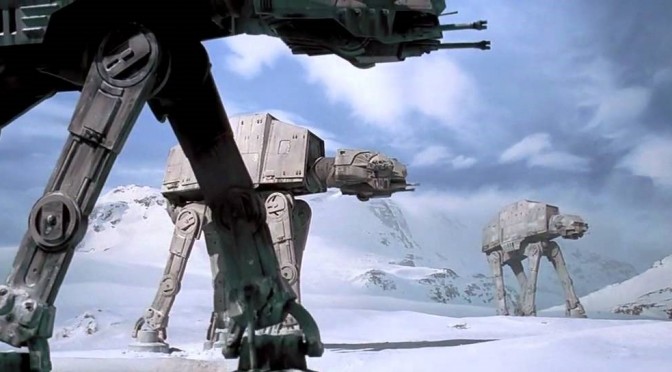
Upon the Empire’s discovery of the Rebel base on Hoth, Lord Darth Vader devised a plan whereby the Imperial fleet would come out of hyperspace at some distance from Hoth and bring its heavy weapons to bear upon the planet. However, when Admiral Kendal Ozzel, commander of the Empire’s Death Squadron, brought the his ships out of hyperspace, they immediately triggered the Alliance’s early warning systems in planetary orbit. The shield was activated and Vader was forced to commit to a ground attack. As predicted, the Empire landed heavy armor along with several battalions of the 501st Legion’s snowtroopers on Hoth, at the only available entrance to Echo Base.
Major General Maximilian Veers had overall command of the Imperial ground force. An armor officer by trade, Veers had been stuck at the rank of colonel for some time. His last assignment had been as an instructor at the armor schoolhouse; with the destruction of the first Death Star, so many senior Imperial commanders had been killed that Veers was elevated to major general. Thus, he was entering his first major ground operation with little field experience in the current operating environment. This was perhaps why he walked right into the trap that the Alliance had lain for him.
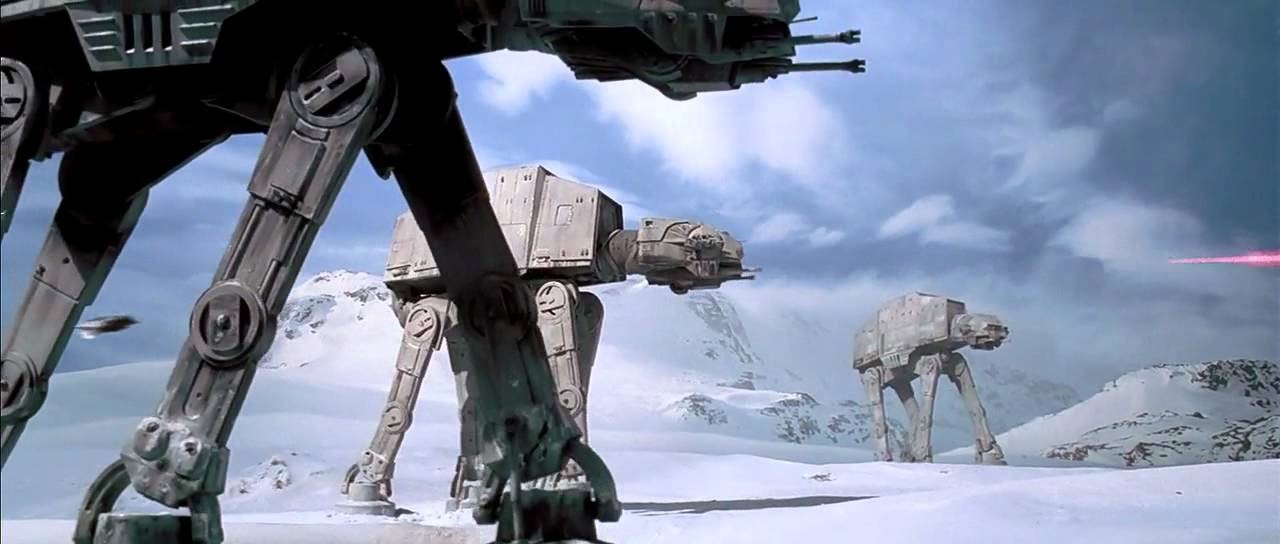
He deployed his AT-AT’s in line abreast into the draw, with the dismounted 501st troopers behind them. Because of this, his first line of armor suffered significantly from the first two mine belts. Veers then moved two companies of infantry forward of his armor, to check for additional traps and mines. As the terrain constricted them into the draw, the infantry bunched up, and were immediately engaged by Alliance crew served weapons concealed on the flanks, causing heavy casualties amongst the snowtroopers. Veers ordered his lead AT-AT’s forward to knock out the Alliance weapons positions, but two were immediately lost when they stumbled into the pits. The top-heavy nature of the Imperial armor caused the walkers to completely collapse when they encountered the pits, rendering them useless and causing severe casualties to the troops trapped inside. In frustration, Veers ordered all his infantry to dismount to get eyes on the Alliance positions.
The dismounted infantry surged forward, encountering the tanglefoot. Company commanders reported obstacle locations back to Veers, who put his armor into single file as Imperial engineers began to slowly breach their way through the obstacles, taking catastrophic losses from Alliance positions. With his armor’s linear firepower thus limited, Veers could only watch in horror as Rogue Squadron struck from his left, their cannons decimating his ground troops. The second wave of snowspeeders were able to neutralize the rear AT-AT with the cables on their speeders, pinning the entire Imperial task force inside the engagement area. Veers panicked and ordered his armor to fan out to engage the targets that they could identify. This decimated the entire armored force, as they could not maneuver out of the engagement area. The armor took 90% losses, with the entirety immobilized inside the engagement area. Veers’ command vehicle was decapitated by concentrated Alliance firepower and he died in flames.
From space, Vader’s rage increased by the second as he monitored the battle below. When he lost communications with Veers, he flew into a fury and committed two more battalions of ground troops. These arrived to observe the last moments of the first task force, which disappeared under sustained blaster fire. Rather than walk into certain death, these two battalions elected to defect from the Empire in their transports.
Vader ordered the planet blockaded and called for reinforcements. However, word of the Imperial disaster on Hoth spread like wildfire around the galaxy. Revolts erupted in nearly every system, tying down all available ground troops and star destroyers. The Imperial blockade winnowed away due to attrition from small Alliance strike groups that ate away at it. In frustration, Vader abandoned the blockade and retreated to where the beginnings of the second Death Star were taking shape. Superior Alliance intelligence tracked him there, and the Death Star was destroyed before it could ever become operational. Battle damage assessments calculated that Vader was on board when it was destroyed, but could not confirm his death. His body was never found. The Empire vanished in the fire and destruction of the insurgency that began with the victory on Hoth.
Angry Staff Officer is an engineer officer in the Army National Guard with an enlisted infantry background. He has blogged under the name ‘Angry Staff Officer’ since 2014 and is a member of the Military Writer’s Guild. He has served in multiple positions in both staff and line units, at the company, battalion, and division levels, and served one tour in Afghanistan. Angry Staff Officer holds his master’s degree in history. He enjoys snark, satire, cynicism, history, and over analyzing foreign policy. He writes at www.AngryStaffOfficer.com and can be found on Twitter @pptsapper.
[otw_shortcode_button href=”https://cimsec.org/buying-cimsec-war-bonds/18115″ size=”medium” icon_position=”right” shape=”round” color_class=”otw-blue”]Donate to CIMSEC![/otw_shortcode_button]
Discover more from Center for International Maritime Security
Subscribe to get the latest posts sent to your email.
+1
Thank you for your devastating interpretation of what you would have done in the Battle of Hoth I would have thought to dig massive AT-AT traps at least 50 60 ft deep hundred yards wide with explosives or lasers if it’s ice and snow and why would you not bury your reactor Core deep enough not to be shot by the lead AT-AT walker